Tips For Deck Staining
Stains are available in a wide variety of colors and transparency. Find one that treats the wood instead of covering it with a film, which can peel over time.
Before you begin, read the stain can label for application instructions. This takes just a few minutes and ensures you use the right amount and type of stain. Contact Deck Staining Round Rock for professional help.
Staining is a great way to protect your deck from the elements while still allowing its natural beauty to show through. The process can take some time, but it’s well worth the effort in order to keep your deck looking beautiful for years to come. Staining is also more durable than paint, preventing cracking and peeling if done correctly.
The best deck stain to choose depends on the look you’re going for and the type of wood you have. Transparent to semi-transparent stains partially fill the pores of your wood, letting the natural grain pattern and superficial cracks show through—perfect for a more rustic, natural look. Paint, on the other hand, is more opaque and filled with pigments—it’s a good choice if you’re trying to hide cracks and give your deck a more refined, less rustic appearance.
A thorough inspection of your deck is one of the most important steps you can take before you start staining. Look for any raised nails or screws, puddles of water that haven’t soaked in, mildew and mold spores, and any other problems you may want to address. You can then decide whether you need to fix the problem area before proceeding with your staining.
Before starting, make sure that the deck has had at least twenty-four hours of uninterrupted dry weather and is free from moss or other vegetation that can pull the stain away from the wood surface. You can also use this opportunity to sweep up any loose debris and dirt, making sure that your deck looks its best before staining.
When you’re ready to begin, be sure to wear gloves and a mask to protect yourself from the chemicals in your chosen stain. It’s also a good idea to cover any nearby walls or trim with painter’s tape to prevent drips from running down onto them. You can also put down a drop cloth to catch any spills or splatters as you work.
You can either opt for an oil-based or water-based stain. Oil-based stains penetrate the wood fibers and pores deeply, creating a tough finish that’s long-lasting and looks great. However, they require more work to apply and clean up (using mineral spirits or paint thinners) and emit strong flammable and irritating fumes. Water-based stains, on the other hand, have an easy application and cleanup, but they don’t last as long as oil-based stains.
Staining
Whether you’ve chosen a transparent stain or one with some color, deck stain protects wood from weathering and helps to keep it looking new. It also helps to prevent the buildup of mold and mildew, which can cause discoloration. Proper staining will also help to deflect UV rays, which can fade the natural color of wood over time.
Before beginning the staining process, it’s important to prepare the area. Cover nearby surfaces with painter’s tape and use drop cloths to catch any stain drips that may fall on your furniture or other outdoor structures. Also, make sure that all doors and windows are shut to limit the amount of stain that can enter your home.
When choosing a stain, consider the type that best suits your tastes and needs. If you’re aiming for a more natural look, semi-transparent stains provide a light tint of color without hiding the wood grain. They tend to be more durable than clear stains, and will usually need to be reapplied less frequently.
For a more refined look, opt for solid stain, which is highly pigmented and opaque. While it doesn’t offer as many color options as other types of stains, it does a good job of hiding surface cracks and splinters, giving your deck a polished finish.
If you’re looking for a more vibrant color, try an oil-based stain. However, if you choose to go with this option, you’ll need a strong-smelling solvent, such as paint thinner, to clean your brush and spray gun after each application. Oil-based stains also take longer to dry and are more sensitive to changes in the weather.
Water-based stains are much easier to apply and require no solvents. They are also less expensive than most oil-based stains and can be applied with a pump sprayer or a standard roller. However, water-based stains can be susceptible to fading over time.
A quality wood brightener will remove any last bits of dirt or grime from the deck’s surface before you start staining. It will also help to prepare the deck for its new coat of stain by opening up the pores of the wood. It’s important to allow the deck to dry before you begin using it again, so don’t allow anyone to walk on it until 24 hours after staining.
Sealing
Before you start staining, make sure you know how long it will take you to complete the task and have all your materials ready. Having all the necessary tools will help you avoid making any unneeded trips to the hardware store. Also, plan to work in sections to avoid running out of material or becoming overwhelmed by the job. For example, if you have a large deck to cover, it will be more manageable to stain the features above the wood, such as railings and balusters, before moving on to the boards. You should also use a hand sander or pole sander to lightly sand any rough spots and create a smooth surface for the stain.
Depending on your preference, you can choose between an oil-based or water-based stain. Water-based stains don’t tend to chip or fade as quickly as oil-based stains and are easier to apply. However, they may not set into the wood as deeply and can allow dirt to infiltrate more easily. This type of stain typically requires re-application more frequently than an oil-based stain.
An oil-based stain provides better protection for your deck, as it is able to penetrate into the wood and block UV rays more effectively than a sealant alone. However, the drawback of an oil-based stain is that it takes longer to dry and is more difficult to clean up.
There are a wide variety of different oil-based stain products on the market, with options ranging from semi-transparent to solid. You should read the instructions on the product that you choose to ensure proper application.
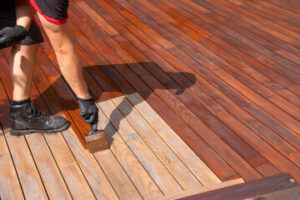
Once you’ve finished applying the stain, wait for it to dry. Then, you can enjoy your newly-stained deck! It is best to prevent people and pets from walking on the new surface until it has had twenty-four hours to dry completely. Using a brush, sprayer or paint pad applicator, apply the stain in long, even strokes. You should also use a brush to get into hard-to-reach areas, such as cracks between boards. Be sure to follow the directions on the stain’s label, as they will vary slightly by manufacturer.
Cleaning
Staining is a great way to highlight the natural grain of your wood deck and help it last longer. Stains come in a variety of colors and tints, so you can customize your look to suit your personal style.
Before applying any stain, make sure your deck is clean and dry. Any dirt or debris can prevent the stain from adhering to the wood, so be sure to sweep it thoroughly. Additionally, any loose nails or screws should be tightened to ensure the stability of your deck.
Once the deck is clean and ready to be stained, it’s a good idea to choose a sunny day to do so. If it’s too hot, the stain will dry too quickly and may turn splotchy. It’s also important to check the forecast, as rain can impact the ability of your stain to penetrate and set into the wood pores.
When choosing a stain, it’s also important to consider the type of wood and what you’re looking to achieve with your deck. Solid stains are fully pigmented and will cover the entire deck, hiding discoloration and providing a uniform appearance. However, they’re prone to issues like chipping and peeling, as well as not lasting as long as semi-transparent stains or clear stains.
Water-based stains are becoming increasingly popular because of their easy application and fast curing process. They also tend to last longer than oil-based stains. However, they don’t penetrate as deeply into the wood as oil-based stains do, and they can be susceptible to bubbles and blotches if you apply too much in one area.
Linseed oil-based stains are another option for those who want to maintain the look of their wood deck, without using a water-based product. While it takes a little longer for the stain to cure (around 48 hours), linseed oil dries with a natural sheen and is relatively low-cost.
Whatever type of stain you choose, it’s always a good idea to follow the manufacturer’s instructions for application and drying time. It’s also a good idea to test the stain on a small, inconspicuous area of your deck before you begin.
Fencing Installation
Fencing can be an expensive project. To control costs, consider using a simple layout and skipping the upgrades regarding gates, finishes, ornate styles, and added landscaping services.

Before any work begins, get your property surveyed. This establishes your yard’s boundaries and helps prevent you from building on your neighbor’s property. For professional help, contact Fence Installation Lansing MI now!
From the zigzag post-and-rail fence of Colonial times to elaborate molded vinyl styles, fences are homeowners’ preferred means of deterring intruders and enhancing privacy. If you have the time, skills, and friends available to help, and a reasonable budget for materials, then it’s possible for you to take on your backyard fence installation.
Begin by making a list of all the supplies you will need for your project, including fence posts, fence rails, fence panels, deck screws, nails, fasteners and other hardware, plus any tools such as a post hole digger or power auger. Then, go to your local home improvement store and purchase the materials you will need. It’s always a good idea to purchase a little extra material, as you may run into surprises while digging and building the fence.
Before digging, locate any underground utility lines and call before beginning the project to determine if they need to be moved or if you will need to obtain a permit for your fence. This step is important because it can make a huge difference in the cost and completion time for your fence project.
When digging the holes for the fence posts, be sure they are deep enough to provide stability after they are filled with concrete or other materials. Generally, the holes should be as deep as one-third to one-half of the height of the finished fence and should be in a soil that is well-drained.
After the posts are in, install your fence panels or pickets along the rails to create your defining style. If using wood, stain or paint your fence for a customized look that is also protective against the elements. If using cedar, apply a sealant shortly after installation and on an annual basis to ensure long-lasting beauty.
Planning
A fence can be a major expense, and you’ll need to plan for it before the project begins. The planning process can help ensure that your project stays within budget and is completed on time. It’s important to understand the costs of materials and labor, as well as any permits or fees that may be required for your project.
The first step in the planning process is to create a budget for your project. This will help you determine how much money you have available and make informed decisions about which products or services to purchase. You’ll also need to consider additional expenses, such as delivery and installation charges. Once you have a budget in place, it’s time to find professional installers and begin comparing prices.
It’s also important to research local building codes and restrictions before completing your fencing project. This will ensure that your fence meets all necessary regulations and can be legally used by you or your neighbors. Depending on your jurisdiction, you may also need to adhere to neighborhood covenants and homeowner association rules.
Once you have a clear idea of your goals and what type of fence you want to install, you’ll need to draw a blueprint of your property. You’ll want to consider entrances and exits, as well as the size of each section. It’s also a good idea to walk the line where the fence will be installed and look for any potential obstacles that could hinder your construction.
This can include tree stumps, rocks, and other debris that may be in the way. It’s also a good idea check for any underground utilities, as these can be costly to relocate or repair.
Measuring
As with all home improvement projects, precise measurements are crucial when it comes to fence installation. Taking your time, using a tape measure that’s stretched taut, and marking stakes at the corners of your planned enclosure is essential to ensure you’re getting accurate measurements.
Your first step is to make sure you know where your property lines are, which may require a trip to the county records or a land surveyor. It’s important to identify your boundaries because if you build a fence on the wrong side of the property line, it will have to be removed.
Next, you should identify any trees or other permanent obstructions that are within the perimeter of your property. These can impact your fencing plans in several ways, so it’s best to work around them as you take your measurements. It’s also important to locate any underground utilities like gas, cable, or electricity lines before you dig and install your posts. If you don’t, and one of these lines is hit during construction, it can be costly.
Once you’ve marked the corner posts, it’s time to start measuring for the fence itself. Use the stakes you’ve already put in place to mark your perimeter in feet, making sure your tape measure is taut to avoid any slack that could throw off your measurements. Once you’ve determined the perimeter of your planned enclosing area, divide it by the length of fence panels (typically six or eight feet) to find out how many panels you’ll need.
Now you’re ready to start purchasing your supplies. It’s always a good idea to purchase a few extra pieces of material to make up for any mistakes or repairs that may be needed along the way.
Building
Installing a fence is a big job. It requires a lot of heavy lifting, and fence panels are bulky. It’s best to enlist the help of someone else, especially when setting the posts. You’ll also need to be sure to wear gloves when handling the wood panels, as they can be splintery. If you are hiring a contractor to do the work, make sure they are licensed by checking with the Department of Consumer Affairs.
Fence installation begins with determining property lines. This can be done by examining your land survey or by talking to neighbors. A licensed surveyor can also be hired to ensure the fence will be within your property boundaries. Some cities and neighborhoods have restrictions on the height of fences, so be sure to check local regulations.
Next, you’ll need to dig the fence post holes. Using a post-hole digger or power auger, dig each hole until it reaches one-third to one-half of the finished fence height. You’ll want to consider the soil type, as sandy or rocky soil may require deeper holes than loamy soil.
Once the holes are dug, you’ll need to install a post anchor in each. This will ensure the post stays in place and prevent it from swaying or becoming unstable after it’s set.
If you are not using concrete, mound dirt at ground level around the bottom of the fence post, and tamp it to create a smooth surface. This will direct rainwater and snow melt away from the fence post, helping it stay stable. If you are using concrete, mix it according to the manufacturer’s instructions and pour it into the hole. Fill the remaining space with gravel and tamp it in place, then add the post anchor.
Installation
A fence seems like a relatively simple project to undertake on your own, but that’s often not the case. Many communities impose constraints on design, height and placement of fences, and it’s crucial to consult your local building department before beginning construction. In addition, determining your property lines is crucial to avoid encroaching on your neighbors’ space. This may require consulting your deed or hiring a land surveyor to determine your legal boundaries.
Digging your fence posts requires special care to ensure that they sit on an even line and have the proper spacing for stability. In addition, you’ll want to call 811 before digging so that buried utility companies can mark where any pipes or cables are located on your property. It’s best to stay 18 to 24 inches away from flags or markers so that you don’t accidentally hit anything.
You’ll also need to make sure that your fence is properly anchored in the ground, which involves attaching the support posts to the ground and bracing them with the panel or pickets. It’s also important to install the posts at the proper depth, which varies according to the type of soil and your chosen material.
Finally, you’ll need to install the panel or pickets, which will require a bit of patience. It’s a good idea to use a pneumatic nailer with 1-1/2-inch nails to speed up the process. Be sure to install the panels or pickets flush with the top, bottom and middle rails, and make sure that any gaps are tight and aesthetically pleasing. You’ll want to install gates at the end of your fence as well, which will require additional hardware and time to complete.